
Free browser-based poster maker
Rasterbator Online Poster Maker
Create a free Rasterbator poster from any photo and download a tiled PDF for your home printer. No sign-up, no watermark, and local browser processing for files from your device.
Popular Rasterbator Tools
Choose the fastest path in this Rasterbator poster maker: create a tiled PDF, start from a template, learn how to print it, or compare example settings.
Multi-Page Poster Maker
Print one image across A4, Letter, A3, or Legal pages as a ready-to-print tiled PDF.
Open poster maker →Printing & Assembly Guide
Print at 100% scale, trim crop marks, align pages, and tape your wall poster cleanly.
Read the guide →The Rasterbator Online
Looking for the classic Rasterbator? Compare the browser-based version and start for free.
Compare options →Wall Art Generator
Turn any photo into large-format wall art with a tiled PDF — living room, dorm, office, or events.
Create wall art →Poster Gallery
Browse real-style poster examples with recommended paper, grid, and halftone settings.
View gallery →Poster Templates
Start with presets for portraits, anime, landscapes, pop art, and large wall posters.
Browse templates →Why Use This Rasterbator Poster Maker
Choose a photo, select your paper size, adjust the halftone style, and download a print-ready tiled PDF. No sign-up, no watermark, with local browser processing for files from your device.
🔒 Private Browser Processing
Files selected from your device are processed locally in your browser to generate the poster PDF. Images loaded by URL may require an intermediary request to retrieve the remote file.
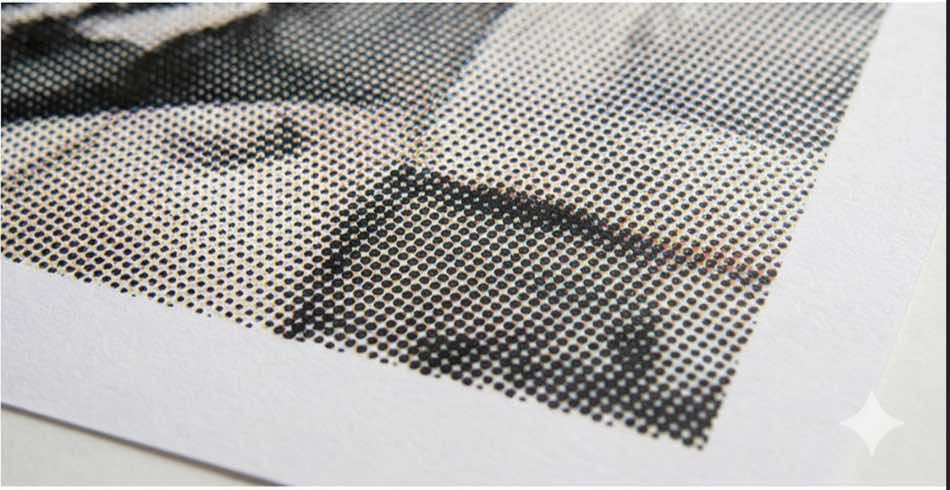
Halftone Magic
The Rasterbator converts continuous tones into a grid of halftone dots. This classic rasterbation effect looks artistic up close and strikingly photorealistic from a distance.
Any Size, Any Wall
Whether you want a small desk print or a large wall poster, the Rasterbator app scales your image across multiple sheets while preserving the original aspect ratio.
Total Customization
Don't settle for defaults. The Rasterbator lets you adjust dot size, grid density, and color modes (B&W, Color, Monochromatic) for one-of-a-kind wall art results.
Instant PDF Export
Configure your settings and download a Rasterbator tiled PDF instantly, ready for any home or office printer.
Smart Crop Marks
Assembly is key. Crop marks and page numbers are printed on every sheet automatically, making it easier to trim, align, and tape your poster together.
Free PDF Poster Maker
Create clean poster PDFs with no sign-up, no watermark, and no credits system. Use it for personal prints, classrooms, events, and creative projects.
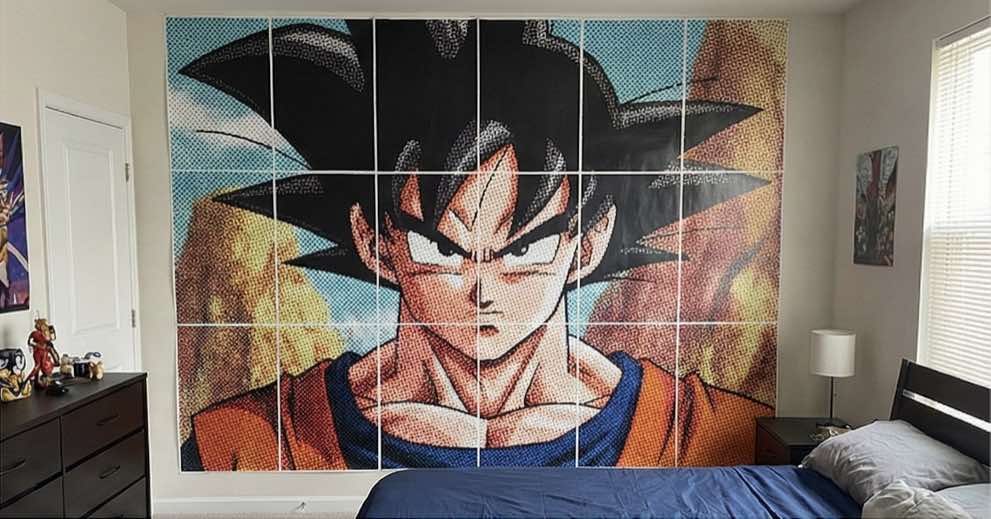
Rasterbator Poster Examples
Use these examples to pick a paper size, poster width, and halftone style before generating your tiled PDF.


What is the Rasterbator?
A Rasterbator is an online poster-making tool that turns one image into a large tiled PDF poster for a home printer. Upload a photo, choose the poster width in sheets, and the tool splits the image into standard pages with crop marks and page numbers for assembly.
The classic Rasterbator effect uses halftone dots: large dots in dark areas, smaller dots in light areas. From close up, the poster looks graphic and dotted; from a few steps away, the pages merge into one big image.
Rasterbator.app brings that workflow to the browser, so you can create a Rasterbator poster without installing desktop software.
How to Make a Rasterbator Poster at Home
Making a rasterbator poster takes only three steps. The Rasterbator handles all the technical complexity — all you need is a photo, a browser, and a printer.
Step 1 — Upload Your Image to the Rasterbator
Drag and drop a JPG or PNG into the Rasterbator, or paste a direct image URL. High-contrast photos produce the sharpest rasterbator output: bold portraits, graphic logos, sports shots, and anime illustrations all work beautifully. For clean, sharp halftone dots across every page, use a source image at least 1,500 pixels wide.
Step 2 — Configure Your Rasterbator Poster
Select your paper format (A4 or Letter), set how many sheets wide the poster should span, then pick a dot style. Four to six sheets fills a typical headboard wall; ten or more creates a statement mural. The Rasterbator automatically calculates page height to preserve your image's aspect ratio.
Step 3 — Download Your Rasterbator PDF
Click Generate to download your rasterbator PDF — no watermarks, no queue. Print at exactly 100% scale with "Fit to page" turned off. Use the built-in crop marks to trim and align each sheet, then tape them together on the back for a seamless rasterbator wall poster.
Creative Uses for Your Rasterbator Poster
Use a Rasterbator poster for bedroom murals, classroom displays, event backdrops, office logo walls, party standees, protest signs, or temporary wall art. High-contrast portraits, album covers, anime art, bold logos, and graphic textures usually produce the clearest halftone result.
Rasterbator vs. Other Poster Tiling Tools
Basic poster tiling tools simply split an image into rectangles. A Rasterbator-style poster adds the halftone dot effect, so the final wall print feels designed instead of merely enlarged.
Rasterbator.app runs in the browser, exports a tiled PDF, supports common paper sizes, and needs no account. It is a practical choice for dorm rooms, classrooms, events, and temporary displays where print-shop pricing is too high.
Frequently Asked Questions
Wall Art Generator for Every Space
Whether you call it a rasterbator, a wall art generator, or just a free poster maker, this Rasterbator tool exists for one purpose: turning a photo you love into something big enough to actually fill a wall — without a print shop, without a budget, and without any technical knowledge. Every rasterbator poster you create is yours to print, share, and display. Upload an image now and see what your wall could look like.