
Rasterbator guide — print, assemble & quality tips
How to Use Rasterbator — Print, Assemble & Fix Blurry Posters
Updated Apr 29, 2026
A complete guide on how to use Rasterbator: download your tiled PDF, print at the correct scale, trim, align, and assemble — plus tips for getting sharp, high-quality results and fixing blurry output.
1. Print the PDF
- Print at 100% scale or “Actual size.”
- Turn off “Fit to page” and any automatic resizing.
- Use the same paper size selected in the tool, such as A4 or Letter.
- Print on one side only.
Best practice: Print one test page first so you can confirm scaling, margins, and paper choice before printing the full set.
2. Understand the Page Layout
Every page includes a position label so you can place it in the correct spot before trimming or joining anything.
How the labels work
- A1, B1, C1, D1 are the first row.
- A2, B2, C2, D2 are the second row.
- A3, B3, C3, D3 are the third row.
What the labels mean
- Letter = column.
- Number = row.
Assembly order
Start from the top-left corner and finish each row before moving down:
A1 → B1 → C1 → D1
A2 → B2 → C2 → D2
A3 → B3 → C3 → D3
Tip: Lay all pages out on the floor first to confirm nothing is missing and every sheet is facing the correct direction.
3. Cut Each Page
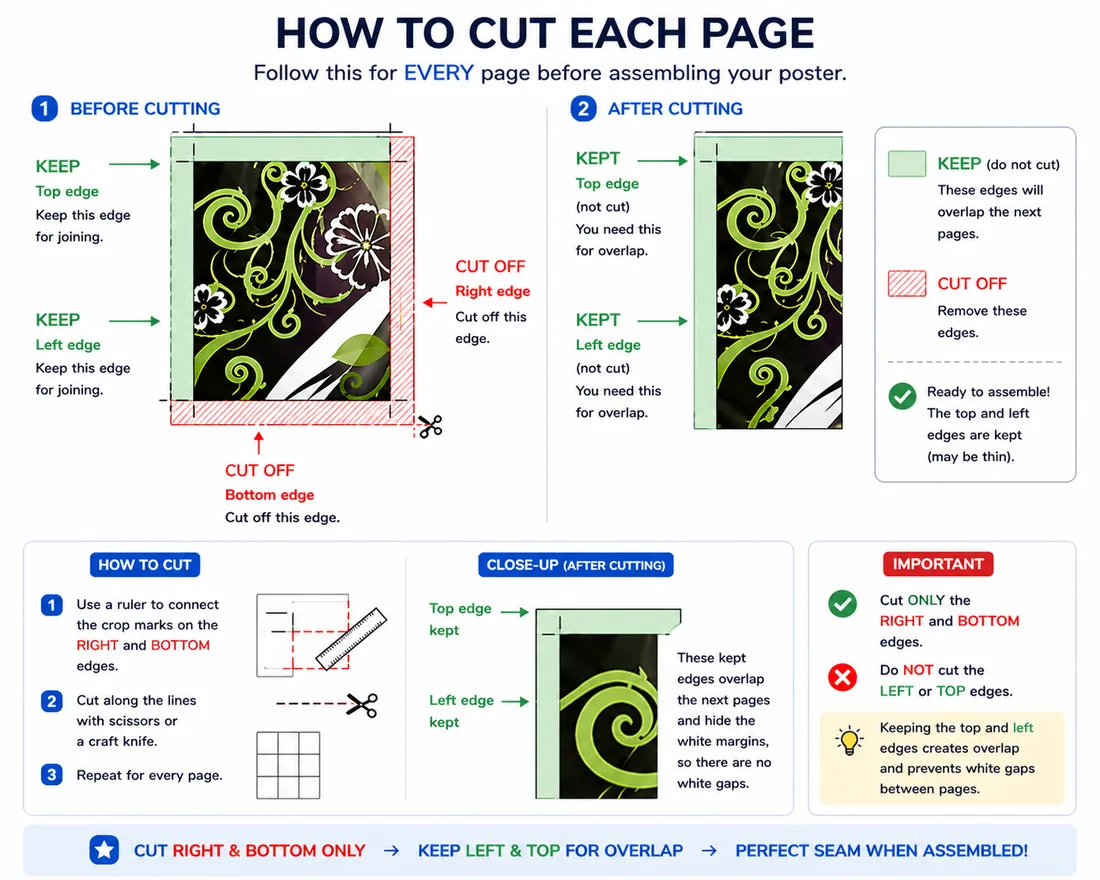
- Cut along the crop marks.
- Cut only the right and bottom edges.
- Keep the left and top edges intact.
Why this matters: The remaining top and left edges create the overlap that hides seams when pages are joined together.
4. Assemble the Pages
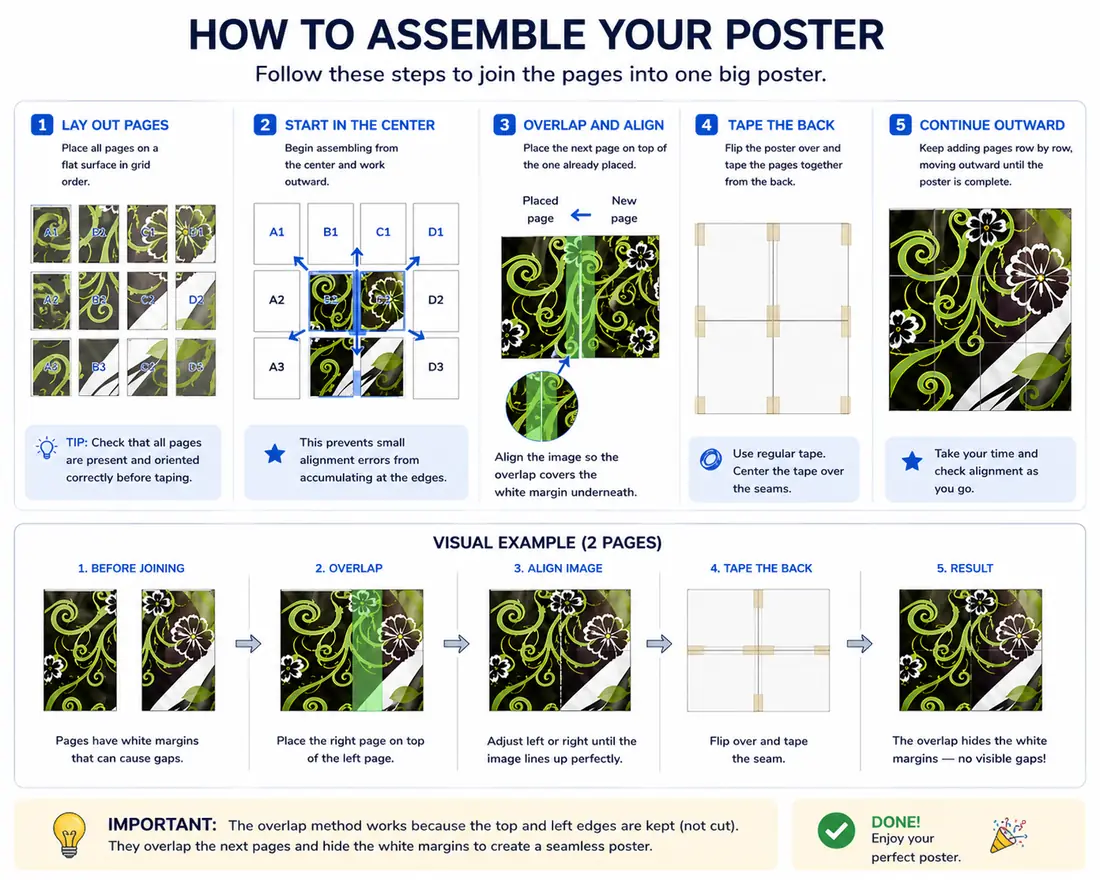
Step 1: Arrange pages
Place the pages in the correct order using the layout grid, starting with A1 and continuing row by row.
Step 2: Overlap and align
Place the right page over the left page, and the bottom page over the top page. Slide the sheet slightly until the printed image lines up cleanly.
Step 3: Fix from the back
Tape from the back when possible. If you prefer a flatter finish, apply glue only to the overlap area.
Key idea: The white margin is designed to hide underneath the neighboring sheet. If the image is aligned correctly, the seam disappears and the poster reads as one piece.
Common Mistakes
- Cutting all four edges instead of only the right and bottom edges.
- Printing with “Fit to page” or any scaling enabled.
- Ignoring page labels and assembling pages out of order.
- Trying to align blank margins first instead of aligning the image itself.
How to Make Your Rasterbator Poster Not Blurry
Blurry or soft-looking output is the most common complaint. The halftone dot effect is intentional, but muddy or low-contrast results are avoidable. Here is how to get a sharp, high-quality rasterbator poster:
- Use a higher-resolution source image. Aim for at least 1500 px wide. The tool can work with smaller images, but larger inputs produce cleaner dots at poster scale.
- Increase contrast before uploading. Images with strong light-dark contrast (portraits, logos, anime line art) rasterbate the best. Flat, low-contrast photos look muddy in halftone.
- Reduce the dot size. A smaller dot setting creates finer detail. If the poster looks blurry from a normal distance, try reducing the dot size in the tool settings.
- Print at 100% actual size. Any scaling distorts the dots. In your printer dialog, select "Actual size" or "No scaling" and turn off "Fit to page."
- Use draft mode only for testing. Print the final version at Standard or High quality. Draft mode reduces ink density and makes halftone dots look thin and washed out.
- Keep the poster small enough for your printer. A 3×4 A4 grid at standard DPI looks sharper than a 6×8 grid from the same source image.
Frequently Asked Questions
One-Line Summary
Follow the page labels → cut the right and bottom edges → overlap to align the image → secure from the back.